Showing posts with label farm chores. Show all posts

Wednesday, November 3, 2010

Spring Water + Old Sink = Fresh Water Container For The Animals

In the fenced in acre where my animals live there are two spring water sources (plus I have a rain barrel I am setting up at the mini barn!)...
I found a nice lil' sink underneath my cabin that I thought would be perfect for catching the spring water that had already been piped before I moved here. I settled the sink into the dirt and then took a handful of thick native clay (that has been dug up when building the barn) and shoved it into the drain to block the water from leaking. (I have tried this trick even with leaky buckets and had total success!)
Me and JuJu the donkey waited for it to fill up completely, drip by dribble for about 30 minutes.
Once the sink was full I had it lean slightly to the left side so that the water would overflow out in one spot... since it's spring water that constantly flows year round whether it comes out in a pour or a drip.
Before even pimping it out with some rocks, leaves and hay, the chickens came by to test it out...
Rooster approved.
I put a larger flat rock under the drip, and smaller rocks around the entire sink to make it sturdy. I also started covering the black pipe I had dragged under the fence with debris just to make it look like it's not there. Would be cool to make a second water pool with some rock and clay only under the drip.
This sink will ensure that no matter what the animals are constantly getting a flow of fresh spring water that has no contaminants in it of any kind (including their own poop.)
Yay, I am feeling clever now. ;)
PS - I got the idea to do this with the sink after having BAD dream last night that something happened to me where I couldn't get home & my donkey had no water and became very sick, I was crying in the dream because I thought she was gonna die of dehydration. Nothing like a lil' nightmare to get you extra motivated.
Xoxoxo

Wednesday, July 21, 2010

Donkey Prep!

Fence is going up! (I used old locust fence posts being taken down from another farm...)
*
Shavings are in her stall! (I got cedar shaving from my cousin who planed some wood ...)

Clover seed has been cast everywhere! (The shit is organic seed of course....)
All for the love of mah DOnkeeeee! Look at her, she can't wait to have me as a friend, I can tell.
Xoxoxoxo

Sunday, July 18, 2010

Building A Watering Hole

So here's an idea I got today that I am building up and testing out. Right behind my mini-barn built for my (soon to come) donkey and chickens I found a small stream of spring water coming out the ground, moving downward then disappearing under leaves and back underground.
I decided it might make a good watering hole for the animals, since it flows constantly with fresh spring water, so I started digging out some of the built up deep silt and mud....
I then took clay that had been dug from deep underground when me and my uncle were putting in the foundation poles for the barn - I dumped buckets of clay across where the water puddled... then the water started to fill up in significant amounts! I put a slight notch in the middle so the water has a place to finally overflow and continue renewing it's freshness.
I still have a ways to go - I want to add more clay to my mini levee and dig deeper in front of it --->but does anyone have any engineering suggestions on how to improve/enhance my idea of a good natural watering hole for my animals?
XOxoxo

Wednesday, July 14, 2010

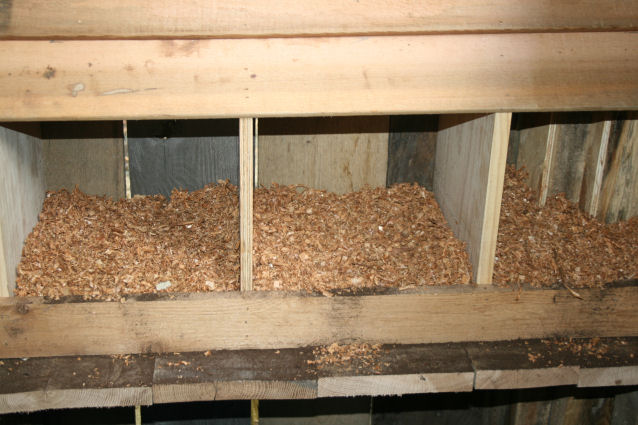
Prepping The Chicken Coop Nesting Boxes

NO chickens yet, but the part of my Mini-Barn (built this month) that is for the hens and their handsome rooster is only a day away from being completed! My uncle who built this barn (who was nice enough to teach me some shit while buidling it) loves raising chickens - he has bunches of chickies, and we designed their safe house together. :)
He said for the nesting box the best layers underneath where the chicken will lay eggs is the following:
  • Bottom Layer - Dirt
  • Middle Layer- Hay
  • Top Layer - Cedar Shavings
I didn't have hay and I noticed all the dirt was wet from the rain. So I made a dirt/hay compromise for now ---
I made the bottom & middle layer all super dry peat moss, and then put thick cedar shavings on top! I figured this was good cause I use peat moss for my compsting toilet, and essentially you want the same kind of 'clean composting' action going on where your chickens will poop-pee.
Hope the ladies will love it!!!
Xoxoxo

Tuesday, January 26, 2010

Learning To Use An Ax Part 2 (The bungee cord idea!)

Ya'll might recall when I was learning better ways to split wood with an ax called a "go devil"? Well, the poor "go devil" is now R.I.P like most things with a plastic handle end up these days (it's cracked at the base) - and we have now moved onto old school wooden handle ax which I like bunches better. But hec, that isn't what this post is about... it's about how we tried out the awesome bungee cord idea by one of my most favorite readers 'Gratuitous'! (Hi, Gratu! Yeah, I am talking about ya...)
I did give a few swings on this bungee cord wrapped humongous black walnut log, which happen to be sitting in thick mud puddle... when I swung down the ax hitting the log that cold puddle squirted me right in the mouth and eye!! lol
So... moving right along.... Here is how this trick works:
  • We tied a bungee cord around the log (see bad ass video Gratuitous found here!)
  • Push it closer to the middle or bottom to prevent breaking the cord itself
  • Go ahead and swing as per normal, except now you wont have to keep standing the pieces back up cause the bungee will be holding them all together!
Pretty sweet idea, cause it worked!
XoXo

Monday, December 7, 2009

Learning To Use An Ax

Oh...Gawd... today I learned how to better split wood with a "go devil" style ax! I have not done much log splitting in my life, being that I grew up in a tropical big city that only sees the icy junk we call snow like once every 20-30 years and also thrived on central heat for the rare chilly days. I remember begging my parents to put logs in the fireplace, just for fun. :)
As you can see in the very top pic, I have to stand and meditate before i swing the ax, getting just the right position before swinging. And I can tell ya, I was doing it all kinds of wrong.
See in the pic above, my hands are WAY too far apart at that point, but my legs are not. The reason I am standing so funny is because should I miss the log, I didn't want the ax to hit my leg instead... even the thought of the chance of some possibility of this occurring terrifies me more then the worst horror movie ya eva' saw X's a million nightmares.
Because my hands were so far apart at the end and too close together at the beginning of the swing, I could not get proper momentum going to crack the log...only getting a few dents...
Once ya give it a good wack and it doesn't split or crack, the ax kinda gets stuck in there - which can seem impossible to pull out, but if you hold down the log, and then pull the ax handle down to the ground in front it will roll back out.
THEN START OVA' !!!
Hells yeah! With the right amount of force, aim and hand placement (which is not really shown below, cause i slid my hand back down after it split), it gets alot easier. The hands start out on opposite ends of the ax in order to pull the weight up over head, and when coming down they slide to the bottom together.
The thing is, I used to use something called a "wedge" to split logs and I can say for someone my size (AKA tiny as hell) using a wedge is a little easier if ya' don't have the body weight to really slam an ax down. But it is never a bad idea to have some basic skills to work with, in case you are ever in a situation where all the easier tools are not available and ya need to make a fire. (Blizzard perhaps? Zombie Apocalypse? Peak Oil? Living out in the middle of nowhere and have no car to get supplies easily? Extreme poverty?)
BTW- the logs were from trees already dead on the property here. Supa' eco-nomical. :)
XoXo