Showing posts with label creative. Show all posts

Thursday, June 9, 2011

Inspiration Daily

Creature Comforts is a blog I look forward to reading daily! Some of my favourite posts are her "Inspiration Daily" images and they really do always seem to inspire me! I hope they inspire you too!


Monday, May 16, 2011

Crayola Totem Poles

I was creating a sign today to describe the artwork that was being put on display for a particular class and in searching for a totem pole image, I came across this:


I think these are just amazing, the time that must have gone in to creating these lilliputian sized artifacts. They were sculpted by an artist named, Diem Chau, and I love their rainbow happiness. What a true little piece of art. The personality that they each appear to have for something so minuscule is quite astounding.

The girl reminds me of the soap carving that Boo Radley made of Jem and Scout in "To Kill A Mockingbird". They have that air of vintageness about them with the styling of the girl's hair and dress. Maybe these would be the modern version of what Boo would carve?


The smell while carving them had to be heaven. I love the smell of a fresh pack of crayola crayons, that waxy scent that is distinctive to them. It is not the aroma of a candle or of any other crayon brand.

There was nothing better in the world when you were little, then when you got a new pack of crayons and a coloring book and your entire afternoon was spent lying on your belly deciding which color you would pick for the ballerina's slippers. Oh, to be little again!


(Images found here)

Saturday, February 12, 2011

Valentine's Round-Up

Valentine's Day is almost here and I have collected a few last minute ideas, recipes and sweetness from some of my favorite places to share with you. Click on the images below to be taken directly to the featured project:

Jenny B. Harris of Allsorts has done it again, with this cute Valentine's Paper Angel. A fun project for your little ones to decorate your kitchen table with:


Serena of The Farm Chicks has created adorably wrapped chocolate brownie bites. A cute idea for the little Valentine Love Bugs in your life:


Eat, Drink, Chic has the most wonderful answer to staying in for Valentine's. Amy Moss, has designed a DIY Valentine's popcorn bucket to invite your Honey Bunny to spend a night snuggled next to you on the couch. You just have to provide the popcorn and the right movie:


The lovely Bridget, of Bake @ 350 has taken "bark" to a whole new level with her Sweet Heart Conversation Candy Bark. A great idea to hand out to your neighbours or any little Valentine's fingers that might be around on the day:


The cute girls at One Charming Party have come up with simple yet effective idea. If you are stuck cooking on Valentine's night, why not bring as many hearts into the mix as you can. These home made heart shaped pepperoni pieces add a cute flair to store bought pizza for your sweetie pie:


And, just in case you forgot to get a card head on over to Eat, Drink, Chic for some DIY printable Valentine's cards and envelopes. You can never go wrong with polka dots!:

Tuesday, February 1, 2011

A New Years Card


I have kept you guessing for the past few days and today I am finally revealing what my secret project was: a New Years postcard. Did you already deduce that? This past year, Christmas arrived in such a whirlwind and with everything that was going on in and around our lives, I had no time to send out my usual Christmas cards.  But, I was not going to feel guilty about that, I had a plan, and that was send out New Year's cards instead.

Well, New Year's Eve came and went and I began my mission, I was on the hunt for Happy New Years cards. I had absolutely no luck. What was I going to do, I thought? And, then I realized, I am from a very long line of creative and artistic people, why was I even looking for a pack of cards. I would simply create my own.

I decided, that instead of drawing one, or creating one through a paper or fabric medium, I would design one using Photoshop. I went through a series of ideas, as all creating processes take and I stumbled on one that I liked.

I used images from a vintage children's book and pieced different parts together to create my card. Using the background of one page, I removed items that I liked from others. Placing a little gnome in the corner and darkening his hat to a more Christmassy red. I put a glowing candle from the Christmas tree into his hand and placed a friendly woodland squirrel next to him.

Next, I placed "Happy New Years" on my card using pink and white as a highlighting color and the front was finished. Then, I moved on to the back, again using the same pink as on the front but with red as a highlighting color. After doing some more nerdy computer work, they were ready to upload. I have used a variety of printing services for different projects along the way, but this time I used MOO. They were a dream to work with!


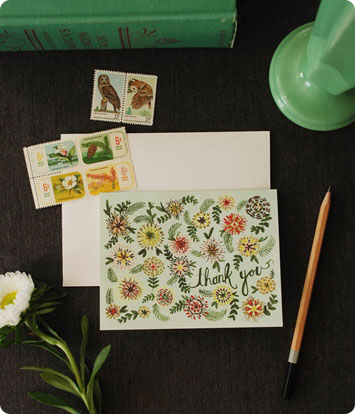
Since, this was not going to be your normal "Christmas Card", I decided that I would send out postcards instead. After uploading my design, I got envelopes to put them in and even had the chance to design my own sticker book. Everything arrived in my postbox this past week and this weekend I got down to business and wrote them.


I had so much fun coming up with a design and seeing the final piece printed up and in my hands, I don't think I will go back, to buying cards again. So, look out, next Christmas I hope to be sending out cards designed by yours truly.

(Copyright, this design was created by Jennifer Michie and is not to be used without permission. All images property of Jennifer Michie)

Thursday, December 9, 2010

Peppermint Twist

I am longing to be crafting. I have a special little project that I need to finish before Christmas.

But with the cottage packed up at the moment, while some work is completed, I can't get to my sewing machine. In catching up with The Purl Bee,  I came across this:


What a fantastic idea it is! And, no sewing, so I can make it, if only I could get to my felt...

Click on the image below to learn how to make a candy cane garland for yourself.

Monday, October 11, 2010

Oh My Word!

Last week, in all the craziness that it was and became, in the five minutes peace I had, I went to a blog I love, Oh My Word, by the very wonderful and kind Evelyn. We talk to each other on Twitter and she has the hootiest husband, who along side his brother has turned an old ambulance into a Ohio State University tailgating machine, which I just love.

In all that was happening last week between work and home, I went to read this very lovely blog and Oh My Word, you will never guess what happened? I looked over to her "fabulousness" column and there amongst other women I admire, sat my little button.

I could not believe it! Surrounded by other great bloggers, Jenny Wren's was there in the "fabulousness" column, well Evelyn, I thank you; you more than made my day, you made my week and I think you are pretty fabulousness too!

If you don't already read Oh My Word, please make sure you take a look, take my word, it is a blog worth reading!

Wednesday, October 6, 2010

A Secret Nook

Tonight as the rain softly falls and the wind whips around the house, I crave to just be still, to sit in silence and just be in a secret nook where I can hide away and get lost in a deliciously good book. There is nothing better than getting lost in a book, what a guilty pleasure that is! Especially if it is enjoyed with a hot cup of cocoa with lots and lots of marshmallows.

Alas, I still have a lot of work to get done this evening and a Christmas gift that I am beginning to work on early for someone special. I want to take some time to read the directions for it and then work on blowing up the pattern, I can't say any more at the moment because it is a secret, shhhh!

But, as I work away I will dream of hiding out in a secret nook like the one above surrounded by walls and walls of gorgeous books.

(Image from "The Holiday" found on Hooked on Houses)

Tuesday, September 7, 2010

Oilcloth Lunch Bags


I love oilcloth. I love the feel of it. Especially the really nice oilcloth, that is like waxed fabric, I used to work in an interior design store and we had the most scrumptious Swedish oilcloth that had that lovely "waxed fabric" feel.

I adore the vintage oilcloth that is available now, reflecting the quaintness of 1940's/50's kitchens. I can just see June Cleaver now with her adorable cherry and polka dot oilcloth or her summer fruits oilcloth with its vibrant blue background laid out on her kitchen table, can't you?

In honour of going "back-to-school" and to pay homage to oilcloth I am doing a feature today on "Oilcloth Lunch Bags" I found on the Martha Stewart site. So, gather your materials from my class "handout" and get ready to just have fun:


You will need:
Oilcloth (pattern of your choice)
Scissors
Sewing Machine
Thread
Velcro or a clothespin


Lunch Bag How-To
The same oilcloth that covers your kitchen table can transport your children's lunches -- or your own -- in leak-free style. These reusable bags will cut back on waste since they can simply be washed with a damp sponge (oilcloth is not washing-machine safe). Use a single print for the whole bag, or cut out complementary patterns or solid colors for side panels. You can attach small Velcro tabs to hold the bags closed, or clip the tops with colorful wooden clothespins.

Cut main piece 29 1/2 by 8 inches and two side panels, each 12 1/4 by 5 inches.
1. Fold long panel, inside out, into U shape with 5-inch bottom.

2. Make 1/4-inch cut at bottom corners of side and middle pieces so bag folds smoothly. Sew-in side panels, leaving 1/4-inch seam allowance.

3. Turn right side out and top-stitch all around, 1/8 inch from edge.


The most important thing to remember while doing this is to use your imagination and just have fun!

I have my eye on some Cath Kidston oilcloth in my beloved "Provence Rose" pattern and as soon as I can get my hands on it, I plan to make my own lunch bag, perhaps with a vintage button to close it with!

(All images and directions are copyright Martha Stewart, for the original article please click here)

The gorgeous Oilcloth.com store are one of my favourite supplies and they have a whole variety of patterns to choose from!

Friday, July 23, 2010

"Beanetta"

I was commissioned last week to make a little bear for a brand new baby. Although, too tiny for the Tooth Fairy, this little bear can stay tucked away in her nursery until she is ready for it.


Affectionately known as "Bean" while she was in the womb, she became known as "Beanetta" once the parents found out they were having a little girl.

She was born July 9th, but still does not have a name that suits her. Welcome to the world Beanetta, I hope you have a name soon!


(Polka Dot border from a Pugly Pixel Freebie)

Tuesday, July 6, 2010

Above Water

Is this week over already? I am ready for it to be and it is only Tuesday! I got my biggest order yet from RosaBlue and I have been busily cutting away felt, embroidering pockets and faces on bears and bunnies, ironing wrens on fabric labels...

I am just trying to take it slow, to do them in color batches, so I don't get overwhelmed. Between trying to keep the household chores up, take care of this order, go to work and prepare for my new job (in which I am doing the "handover" this week), I am endeavouring to keep my head above water.

But, when I feel overwhelmed and nothing seems to be getting accomplished, I take some "Jack Byrnes Wisdom" and I step back, take a deep breath, take a break and go back to it in a little while. It will all get accomplished, not everything all at once, maybe not as quickly as I intended or how I planned and organized it, but in the end it will all get done.

So, right now, I am just focusing on keeping my head above water, I've always liked a good challenge, so I am more than ready to take this on....

(Image: Esther Williams found on Flickr)

Thursday, June 24, 2010

A Place to Be

It is warm here today, the sun is coming and going as giant puffs of cotton candy clouds pass by. It is the perfect day to find a cool place in the shade and just be. Just be with a book, with music, with yourself. This looks like a good place to just be, but looks can be deceiving. This place to be is actually inside here:


This is one of many adorable pieces created by The Rifle Paper Company. I discovered them a little while ago, while searching for something on Martha Stewart. I went to their website and followed that to their blog and I was enraptured! Look at this stationary:


If this doesn't make you want to sit right down and write a letter to someone, I don't know what would! I still believe in snail mail you see. For as much as I write online and e-mail, there is still a magic in sitting down and writing a good old-fashioned letter and posting it off into a shiny red postbox as it begins its journey to be popped into someone's mailbox on the other side of the pond.


And, I look forward to them as well. Getting a letter from my Mom, my Sister or my Nana in the mail is like a mini Christmas. To touch what they have touched and see what they have written in their beautiful handwriting. Now, that to me, is worth more than gold!

To see this beautiful stationary for yourself, click on the link below:


(All images copyright: The Rifle Paper Company, embellished by: J. Michie, Polka Dot Frames: The Pugly Pixel)

Friday, June 18, 2010

Shirt & Tie


In lieu of the traditional shirt and tie for Father's Day, I thought this card was quite cute and could hold tickets to a Summer concert or coupons, good for a day out with Dad.

One more day to go, so if you haven't gotten something yet, this was just too cute not to share. I am loving the Japanese origami techniques...

Directions:
A shirt and tie are a traditional gift for Dad -- a card to match is something new. Use legal-size (8 1/2-by-14-inch) decorative paper.
1. Place paper facedown. Fold in half vertically; unfold. Line up left edge with centerline fold, and crease; repeat with right edge. Unfold, and lay flat.
2. Fold top-left corner in to line up with outermost crease, forming a triangle; repeat on top-right corner. Using index fingers and thumbs, pinch together outside points of each triangle so they meet, and crease.
3. While still pinching triangles, fold down top edge (this will make sleeves).
4. Turn paper upside down, and flip it over. Fold down top edge 3/4 inch.
5. Flip paper over. Fold top left and right corners so tips meet at centerline.
6. Tuck bottom edge under collar, and flatten by creasing. For the tie, cut out an 8-by-1/2-inch strip of decorative paper. Knot paper. Snip close to knot on one side; trim other to a point. Glue to shirt.


(Images and directions copyright Martha Stewart)

Granny Knot vs. Wreath Knot

Now that I have my lovely new Birthday shoes (see: New Shoes), the question that begs to be answered is: Granny Knot vs. Wreath Knot?

After seeing this video, I think I will never go back... no more double knots for this little lady. You have to wait to the end too see what I am talking about, but it is worth it!


P.S. If you do not have Instapaper you should definitely get it, I have become an Instapaper junkie for those times I don't have time to read what I want, I can instantly save it and I can then, go back to it at a later time or date. Now that, is just happiness!

P.S.S. Instapaper is not paying me to advertize for them, I just like their product!

Sunday, May 16, 2010

New Blog Header

I have put a new blog header up. After a year with the same one, I was itching for something different to be up there! I have been playing around with this new design for a few weeks and I think I have finally tweaked it (with a bit of help from my adorable red-head)!

So I have gone from this:


to this:


I LOVE it! Especially the gnome.... 

I have also created a new button:
you'll find it further down on my sidebar under everyone I love, so grab it and spread the ♥!

Tuesday, April 20, 2010

Light Box Happiness

I am covered in little pieces of felt at the moment and busy sewing away. I have another bear and bunny order.

So I have steadily been cutting and sewing and marking on little bunny whiskers and bear faces and this process has been made all the more easier by my new light box.

My adorable ginger was tired of seeing me use the lamp as my light box and one evening I came home and sitting on the table was a shiny new light box just for me! Now that, to me, is l♥ve! It has made my life a million-bajillion times easier! I am now, quite happily nestled in my little corner of the room I've carved out as my studio space, working away and listening to music.

This is what I have playing in my ears at the moment from the Away We Go soundtrack. I really liked this movie. It is just about being, about finding who you are and where you belong and who you belong with, its story was sweet.


I have also been busy ironing away this morning, making more Jenny Wren labels to be sewn into little bear and bunny legs, so now,  I am going back to stitching on fluffy bunny tales and putting teddy bear ears together....


Monday, March 29, 2010

Some Bunny Loves You

These bunnies are too cute for words! I saw them this weekend posted at The Purl Bee blog. They would be adorable set around a child's place setting at an Easter table (or for grown-up kids too). I would love one at mine!

I come from a very large family of extended aunts, uncles & cousins. Both of my parents are 1 of 8 children and it doesn't matter how old I am, or how long I have been married, I am still at the children's table when we go to my grandparent's house for family events. But, hey, you have more fun with those little people anyway, and with these little finger puppets we would be having a ball!

These bunnies would even be cute tucked in an Easter basket as a surprise from the Easter Bunny, you just have to have one small fun thing hidden amongst all the jelly beans and peeps and chocolate placed in the Easter grass of your basket!

To make your own little bunny Fu-Fu finger puppets follow the directions here:


(Images copyright The Purl Bee, embellishments, Jennifer Michie)

Thursday, March 25, 2010

Pom Pom Bunny Girl

This elfin sized Pom-Pom Bunny, by the very lovely Jennifer Murphy has been in my little project file for awhile now. I don't think she is going to be made this Easter, with all the other projects I have on the go at the moment...

But, her vintage sweetness would look very cute on my kitchen table or next to my Easter egg tree. I need the rain to hold off on Saturday so we can go on our twig hunt. Easter is almost here and I haven't collected twigs yet for my tree, once that is done we can get the eggs out to hang up and really feel like Spring is here.

To make your own Pom-Pom Bunny Girl follow the directions below:
 
Tools and Materials
Yarn
Waxed thread
Scissors
Felt
Felt glue (such as Beacon's)
Hemostat
Tiny black beads
Pink embroidery floss
Needle
Heavy thread
Chenille stem
Paper cupcake liners
Pinking sheers
Ribbon
Vintage flowers (optional)
Small circle of wood
Off-white paint
Paintbrush
Pink paper

Pom-Pom Bunny How-To1. Print Bunny How-To PDF to follow along with when creating the pom-pom bunnies. Make two separate pom-poms of equal size by winding yarn around two fingers. Tie pom-pom tightly in middle with waxed thread.
2. Use scissors to clip loops and create frayed ends. Trim a larger pom-pom into an oval for the body. Trim a smaller pom-pom to create a head.
3. Cut ears out of felt. Fold and glue the bottom of each ear to give it dimension, and hold into place with a hemostat until dry.
4. Glue ears into the head with felt glue.
5. Glue bead eyes into place.
6. String pink embroidery floss through the space where the nose should be. Trim.
7. Knot a double-threaded needle with heavy thread; pull through and clip long for whiskers.
8. Open a space in the body for the arms and legs made of chenille stems. Glue chenille stem into pom-pom body.
9. Fold chenille stem in half so cut end gets hidden inside the pom-pom for both the arms and legs. Fold legs vertically, and arms horizontally. For the legs, fold them so the bunny becomes the desired height.
10. Glue head onto body.
11. To make the bunny's skirt, cut the circular bottoms of two paper cupcake liners with pinking sheers.
12. Glue the two pieces together at the waist.
13. Tie a bow around bunny's neck using ribbon.
14. With glue, tack the skirt onto the bunny on the front, back, and under each arm. Dab small dots of glue around the top of the skirt and attach.
15. Bend the bunny's arms. Glue on vintage flowers for decoration.
16. To create a base, paint a small circle of wood off-white. Trace the circle on pink paper.
17. Cut just inside line with pinking sheers and glue onto the wooden base.
18. Bend the bunny's feet at the ankle. Glue feet onto the wooden base.

(All images & tutorial text copyright Martha Stewart)

Tuesday, March 16, 2010

Shamrock Boutonnieres

St. Patrick's Day is tomorrow and in case you need to make some last minute St. Patty's Day crafts these sweet boutonnieres are on the Martha Stewart website.

They are absolutely adorable and would work well as something cute on your lapel to take you through Spring. You could even add a little ladybug on a leaf for extra luck, if you can find one tiny enough.

Tools and Materials
 Cotton fabric
Waxed paper
Paintbrush
Liquid starch
Iron
Scissors
Pencil
Floral wire
Craft glue
Green ribbon
Corsage pins

1. On waxed paper, use a paintbrush to coat both sides of a cotton swatch with liquid starch. Let it dry. Iron the fabric to flatten it.


 2. Photocopy shamrock templates to desired sizes. Cut them out, and trace them on fabric; then cut out fabric shamrocks. Crease each leaf in half lengthwise.


3. To make a stem, cut a 4-inch piece of floral wire; fold it in half, and twist it until the ends form a tiny V. Bend the V forward slightly and attach it to the back of each shamrock with a small dab of craft glue. Tie a bow around one stem or a bunch of shamrocks. Use a corsage pin to fasten to your clothing.


Click here to get the full set of directions from the Martha Stewart website.

(All images and direction text, copyright Martha Stewart Living)