Showing posts with label traditions. Show all posts

Wednesday, January 5, 2011

A Family Tradtion #1


Collecting shells on the beach is a tradition children remember forever.

25 years ago Topsy, my cousin’s grandmother, would walk along the beach in front of their family beach house at South Golden Beach with my cousins and they would collect shells. Topsy has since passed away however, when the family sold the beach house, my cousin Ben kept some of the shells they had collected over the years. They now sit in a bowl on his coffee table in his beach house which he recently built 2 streets away from his grandparents old beach house.  I am sure everytime he and his brothers look at those shells, they are reminded of those special times with their grandmother on South Golden Beach.  Ben will no doubt continue this shell collecting tradition with his own children one day. 

I have photographed the shells as above.

A Family Tradition


I believe in Tradition. I believe in following the thoughts and actions passed down to me from the older generations in my family. I live my life based on the things my family has taught me and I hope my boys will inherit this same way of life.

Over the holidays I've had so much spare time to think about what is most important in my life and every time it comes back to my family and the way we live and have lived since I was a little girl.

So, this year I am going to talk more about tradition here on ABT. I am going to post a series called A Family Tradition. I hope it inspires you to think about the traditions and beliefs your family has instilled in you and maybe, if those traditions have been forgotten about, you might be encouraged to re-instate them.  Or maybe you might be inspired to establish some new tradtions for your family to embrace.

Wednesday, April 7, 2010

DIY:Rabbit Poo & Earth Clay Pottery

I get really excited when I think about making any kind of art supply/craft with stuff right outside my house for free, earth friendly & simple. So when I was told I could make some pottery with dried rabbit poop (alternately bone dry horse or cow poop) and some clay-ish soil dug from the ground I could not wait to get my hands on this project! So here is the 100% natural, chemical free, and old world process I tried out ::::

Gathering Supplies:

You will need to find some kind of super duper dried up poop of a grass/plant eating animal - and some dirt. The more hard clay the dirt is the better and easier to begin with. Sand can also be added to this project but I didn't have any, so I tried it without.

Gathering rabbit poop takes a while cause it's not exactly huge, but I knew a spot in a open area where I'd seen bunches of scat and tried filling up my can.... You'll want as much as you can get cause the more the poop the more malleable the clay will be.
Then I went to a spot I had found some clay a few inches under the black soil, it was a yellow/tan/brown colored clay.

Setting Up A Work Space:

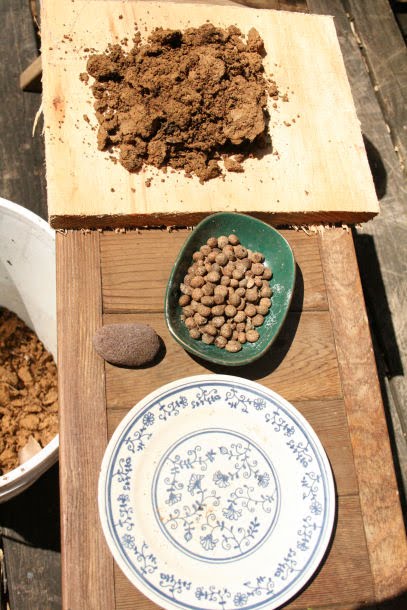
I took a bench and set up a pile of the clay on a piece of wood I could knead the clay on, a plate of water for wetting the clay, and the rabbit poop to be crushed/powdered.
The Process:

I put the rabbit scat in a bowl and took a rough stone to crush it into a powder. The poop has to be super dry for this to work good.

In mortar and pedestal fashion, the poop will become a powder that you will need to add bit by bit to the clay.
I added it in slowly, kneading in the rabbit scat and water to keep it wet. The clay-ish dirt went from cracking and hard to work with to becoming a slimy traditional clay that was easy to shape and play with. More poop seems to mean more awesome!
Just like store bought clay, ya gotta roll it, mash it, move it, work it over and over to get it the right consistency. Also working out air bubbles.
I added water to keep if from cracking often... (i wonder if the sand would help with binding it together also???)
Pretty rad, right? Went from dirt in the ground to a ball of clay ready to be the whim of human imagination or functionality.
I decided to make a small simple coil pot, starting with a round slab - I didn't want to get in depth till i learned out the clay would work and dry...
Coil pots are jus' rolling out little snakes, and coiling them upward...
Then you can smooth the coil together with wet hands, to make the sides flat.
YAY! little pot. Tiny pot! Poop pot! Lovely pot!
I played around with making marks on it too with my knife (see below).

THE NEXT DAY:

So the next day my pot was rock hard, and I don't think it was even nearly all the way dry. First I am experimenting with sun drying, and then I would like to later throw it on a fire and hope it doesn't explode. But there was a problem already..........
It freakin' CRACKED on tha' bottom. shit. . . . . Nothing a little more clay can't fill in though.
What'dya say, that this DIY eco art project is a 90% success and 10% fail ? Seems 100% amazing to me regardless of the end result.
And, it still looks good from far away. ;)
Xoxoxox

Tuesday, February 16, 2010

Mirliton: Holding My Own Louisiana Tradition

That funny looking vegetable is called a mirliton (not the kitty, it's called Toots!) Growing up in New Orleans, Louisiana I quickly learned that this was one veggie to be raised high, honored, and cooked especially on major holidays. While the rest of the world concentrated on their thanksgiving turkey or holiday ham, we talked about who was making the shrimp mirliton. We pronounced it all kinds of funny ways like 'mella-tah' or 'merl-ee-taw' but never how it is actually spelled.

Funny thing is, I have no memory of actually eating a mirliton - only hearing about it, like some kind of legend, about as real as unicorns and fairies. So I asked my mom if she would mail me some so that I could try and grow them up here in North Carolina - she was happy to oblige, picking up a few at Whole Foods on Magazine Street in New Orleans. She asked around and some friends told her that in order to grow them, you have to just let them sprout on their own, in a paper bag... kinda like letting potatoes make their tubers (even though a mirliton is a type of squash, like butternuts!) So I have been letting my 4 mirlitons sit... and guess what? Two already started to sprout in a matter of a few weeks!!! YAY! (See pic below)

Go HERE for a traditional Louisiana stuffed mirliton recipe... ( I so wanna alter this recipe and make up my own gluten free/macrobiotic/yummy stuffing!)

"Although most people are familiar only with the fruit, the root, stem, seeds, and leaves are all edible. The fruit does not need to be peeled and can be eaten raw in salads. Cooked or raw, it has a very mild flavor by itself, and is commonly served with seasonings (e.g., salt, butter and pepper in Australia) or in a dish with other vegetables and/or flavorings. It can also be boiled, stuffed, mashed, baked, fried, or pickled in escabeche sauce. Both fruit and seed are rich in amino acids and vitamin C. Fresh green fruit are firm and without brown spots or signs of sprouting. Smaller ones are more tender." -wikiXoXo