Showing posts with label primitive crafts. Show all posts

Friday, September 10, 2010

All My Awls

Not too long ago I was needing an AWL to finish the brain tanned buckskin skirt I had started to craft at one of the Firefly Classes I took. With buckskin sewing, you poke holes with an awl into the leather and lace up the pieces that you would "sew" together with leather thongs (strips of leather, or laces of leather).
This was the first time I learned about the tool called an "awl" which by definition just means a long pointed spike and can be used in endless ways... but specifically I needed a stitching awl, a tool made from metal in modern times but back in the day it was crafted from carved bone dating back to the romans and the paleolithic age.
So to say I was delighted when suddenly I was given handmade awls, let's just say i was 'awl' vaclempt.
*
Bort hand carved two awl handles from some silver maple wood, one awl point he carved from a cow bone... the other a nail. The nail was hammered in first, then the nail head end cut off, and the metal sharpened with a metal file.
The metal is alot harder to sharpen by hand then the bone, I believe (correct me if I am wrong guys!).
Urban Scout used a larger deer bone, leaving the structure of the bone as a handle - and he said he sharpened the bone on a concrete sidewalk, and made a sharp flat shaped point.
This is what he said about the awl pictured above:
"Leslie, the bone awl is made from an “Ulna Bone” but I use cannon bones as well. The ulna has that nice finger holding groove in it and sits in the hand very nicely. Cannon bones and a bit more work."
*
I like the idea of using bone more then metal, because you can sharpen it on a rough stone (or like Scout right on the sidewalk outside a neighborhood house) - with metal I worry about breathing in metal dust or getting it in my eye.
For the awl handle I love both styles these guys made, but there is something really nice about the feel of the wooden handle fitting easily in the palm of my hand.
...
Now to finish that fringe buckskin mini skirt!!

Xoxoxox

Tuesday, August 24, 2010

Making Kudzu Rope with a Drop Spindle

Remember back in the day when Bort came over and showed me how to make natural rope from the Yucca plant in my yard.... (probably not cause that was soooo winter 2009, check it out here.)
Yesterday he came over with a hand made Drop Spindle he carved from wood and weighted down with clay, and showed me how he used it to make rope from kudzu vines!
*
FIRST STEP - He took the kudzu vine and bash-n-smashed it between two pieces of wood to separate the fibers (see top pic). Then it made it easy to peel away the strong outer layer used for making the rope. (On the really young vines the inner layer was too soft.)
SPINNING IT :::::
Take the piece of plant fiber/string and hook the center of it to the spindle, folding it over into two pieces...
...then begin twisting it tightly, holding strong tension so that it doesn't fold in on itself....
as you go along, you add in pieces to the twisting, just kinda stick them in there and make sure they get caught up in the twisting. Put them in long before the piece you were working with is going to run out...
If you are doing this project alone (which most the time I am!) then it's best not to make it longer then your arms length for each section, that way you can still hold the tension when you have to remove the first length of twisted kudzu....
PULL the twisted rope off the hook at the end while holding the tension --- you can use both hands, another person, or like Bort, ya TeeTh! After you pull one end off the hook wrap it around the spindle in order to make room for the next section of rope....
...wrap it close to the end you were working on, then double wrap that end to the hook again and start the process over... this is how you get the rop to be longer, and longer and longer.....
(BTW- your arms will be hurtin'!)
I took a turn to make the next length of rope on the drop spindle and then once it was the length I wanted and I was ready to move onto the next step, I tied a knot in the end I had been working on. STILL holding the tension.
Take the knotted end and tie it to something (especially if you don't have someone there to help you!) .....
WHile holding the tension TIGHT unwind the rope that is wrapped around the spindle, and make sure when you get to the end you are holding that end piece tight also ( I accidentally let it drop and it lost some of it's tight quality).
Hold the tension tight, and find the center of the rope....
THEN the MAGic ::::::
Fold it in half at the center, let go, and watch it twist onto itself!!!
Pretty freakin' rad? yes?!!
There is something primal and fulfilling about knowing how to make your own rope... F the Home Depot type stores, there is plenty invasive Kudzu on the side of the road!
PS- I thought about making a rope halter for JuJu my donkey out of the kudzu rope but she likes to eat it. :))))
Xoxox

Monday, July 26, 2010

I've Been Re-Wilding At Firefly

Guess where I have been since Thursday??? Re-Wilding classes at the annual FIREFLY!Firefly is a local Western North Carolina 'gathering' of people (all ages) who want to learn how to do amazing re-wilding, primitive, homesteading, crafting & earth easy skillz --- it consisted of 4 really intense days of classes taught by lovable teachers who don't just know the skillz but live them every moment of their lives.
I arrived at Camp Pinnacle wednesday night for registration, where i was given a canvas name tag and a little wooden bead on hemp string bracelet to show I was now part of the re-wilding tribe. I was then handed a map, with a LONG list of classes to choose from--- so many classes that it was literally agonizing trying to decide....

Classes available were an expansion on primitive ways of life, and survival knowledge... wild mushroom, tree & plant walks, building rafts, tanning animal hides, carving wooden spoons and bowls, basket weaving, slaughtering chickens & goats, trapping animals, debris shelter & friction fire making, flint knapping, sewing with buckskin, making bows and arrows, DIY Oil lamps, pottery (should I really go on?... you can see the list here cause you will want to go next year! )
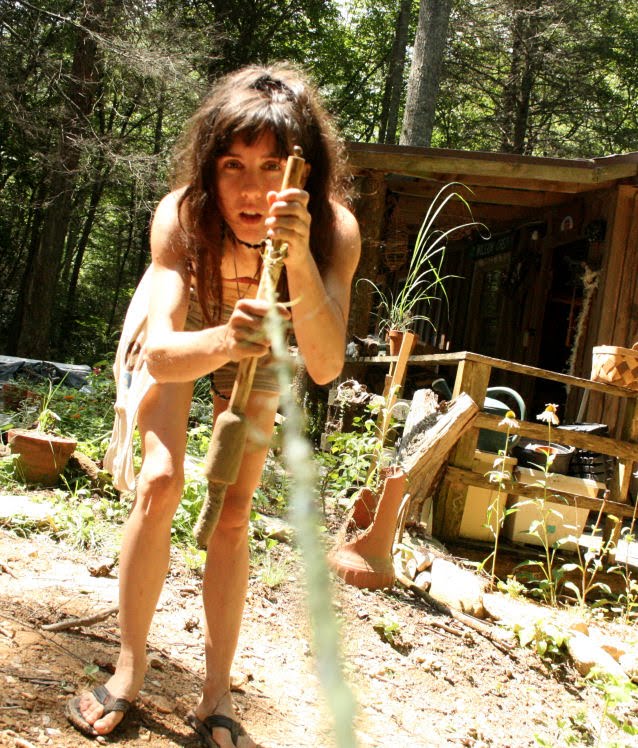
Before any classes began, there was a short & sweet orientation where a man walked out to start a ceremonial fire with a bow drill, using friction (see pic above) - I seriously thought we'd be there for 30 mins waiting for the fire to start but it could not have been more then 5 minutes that he started a whole bonfire, using just friction & his breath into the smouldering kindling. It was f-en incredible!
CLASSES/STUFF I LEARNED::::::
The first class I attended was spoon carving - a technique that was not easy, but also was shockingly simple. The teacher (Barron, see guy in jumpsuit above) started with just a simple small piece of fresh cut green wood and a hatchet to split it into a thinner piece to begin carving with.
We used tools he had handcrafted himself & our personal knives (cause at this event everyone carries a KNiFe!!) Starting buy gouging out the spoon center, then carving around it....
this is my spoon below, almost finished. Chunky, but oh my gawd I was sooooo proud & love it.
I was really into learning how to tan animal skins, so that I can use them to make clothing and other long lasting items...so I took a BARK TANNING class with Todd (the rad guy who can start fast friction fires!)
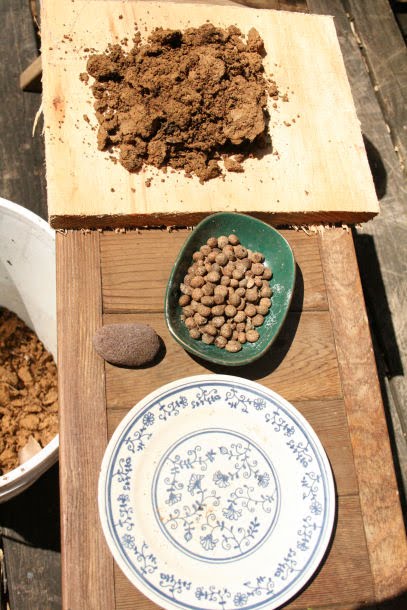
This class was also simple, chemical free yet a hard working process - I learned how to use hemlock tree bark & red oak to tan animal hides--- the bark has to be pounded into a powder and then either boiled down or soaked in water. He said if the water is cold sometimes with Hemlock it brings out the astringent tannins instead of the bitter ones, and FOR realZ he had everyone in the class taste the tannins so they could know the difference because the bitter ones work better! I totally only sniffed it... ;)
People not only tasted the tannins he had in jars, but they even tasted the tannins holding the animals skin in the bucket - the tannins are so strong, they kill everything (germs, foot fungus) - the color from the bark made a soothing shade of red on the leather...
He showed us animal skins tanned with and without the fur on too - the smaller critters needed a stronger quicker solution, while the bigger ones, start out with weaker solutions. The coolest part was it's REALLY hard to fuck up this process, the part that is most likely to get messed up is during the skinning and scrapping that is done before the tanning.
A favorite class of mine (mainly cause i was totally loved by my teacher Laura) was the Pine Needle Baskets!!! I have been waiting to learn how to weaves a nice tight basket for along time- and this method was a fairly easy coiling method, using long pine needles. You can use other gathered materials too (I am hoping to make some out of grass, devil's vine, and kudzu).
Using just hemp twine and a needle, we were taught to coil & weave the basket together, in a patterns of circles.
Later on during the night, when I went to decorate my basket with beads, Laura was nice enough to show me how to make OLIVE OIL LAMPS (which can also be done with animal fat and other slow burning oils). Simply by filling a glass or ceramic jar/container with the oil, then taking a wire, coiling it around a nail, then pull the nail out and shove in a cotton wick. Make the large wire circle at the bottom and handle at the top to make it easy to pull out and stand up...
Have you eva' heard of Brain Tanning Animal Hides? A process different from bark tanning, but brain tanning makes the leather so buttery soft (without using any chems) it's hard to believe --- I took a class on how to Sew With Buckskin that had been brain tanned!
Not using needle and thread, but using cordage made from the skin itself and an awl to poke the holes to lace it through - following the contours of the animals natural curves to decide it's best use (AKA does it make a good shirt, skirt, top, or purse). Parts of the hide are stronger then other, like the neck, spine and bottom - and the outfits need to be made with symmetry in order for them not to get out of shape only on one side.
I am still working on my project, but it's going to be a fringe skirt (shown below) and a bikini top(not shown)! wooo!

OTHER ENTERTAINMENT:::::::::::::

FireFly was at a place called camp pinnacle, that had been a summer camp in Hendersonville, NC for the last 80 years. There was a beautiful and warm 17 acre lake to swim, canoe, kayak, dive into- and for some designated areas to even skinny dip in!
At night there were 3 fires going, with drumming, hoola hooping (fire on the hoola hoops!), dancing, singing, and even some fiddle playin'!

Watching the people go absolutely tribal and bazzzurk around the fire made me feel like i was Britney Spears on the side lines of something really different then myself. I stayed an observer, but one who could hardly stop looking.Other types of evening activities consisted of primitive potluck & cookoff, barter fair, and my very favorite the "trade blanket"! No money allowed at the trade blanket, everyone who had something to trade sat in a circle, one by one placing what they wanted to trade on the blanket in the center. Each person had a chance to offer a trade or refuse, some people offered stuff like herbs, mead, massages, fudge, juggling lessons, animal furs, animals antlers, handmade jewelry, feathered earrings, drums, books, clothes....
Firefly runs on a sliding scale ($$$) for classes, and you can go for the entire event or just for a day... It was totally worth every moment, every penny, and every missed wink of sleep (and even the long drive which was difficult for me)!
I highly recommend this event to anyone interested in learning how to really live in union with nature, our natural biology, and our deep need to be true survivor.
XOxoxox

Thursday, July 15, 2010

Part One: Building A Lean To (Debris Shelter)


With the picture above in my mind, ingrained into my memory from reading various outdoors, survival, camping style books - on a whim I took a pile of dead branches from some recently cut trees, and started constructing a make shift Leslie style lean to!
*
I lucked out cause some kids showed up when I was partly started and begin helping me by carrying, cutting, and building the primitive shelter too. (That is my sister's kid Cam, my cousin's kid Stephanie, and then last in the pic is me. I know I am the same size as kids.)
I am using a live tree for the 'backbone' of the shelter that is leaning all the way to the ground, making a perfect beam for an A-frame type of debris shelter. The A-frame shape is my favorite kind and I have always wanted to try it out!
In the pic below you can see I even began a small door on the side, so it could have more then one entrance, and just to see how it would work out. Pretty neat! :)
After a few hours the kids left and I was back into it by myself - loading on thick branches for good structure and lots of little ones in between. I tried to have the biggest ones go all the way over, or at least to the top of the 'backbone'.
After many hours of work on this today, this is how far i got...
It looks like a cozy cave!
But it will need more on top to be rain proof....

XOxoxo
PS- taking suggestions on how to get to PART 2 .... what should the 'cover' be on top the stick structure?

Monday, April 12, 2010

Eco Art: Earth Clay & Rabbit Poo Part 2

This is NOT a big cookie ya'll! It's just more clay and rabbit scat.... and that's not chocolate chips I stuck on top there either, it's broken glass. But doesn't it look delicious, huh ? :)

I am loving making stuff out of the clay in the ground by my house and with rabbit poop! Only problem is I have run out of rabbit poop since I was just finding it out in the field (I don't have a rabbit.) I may have to walk down the road to the sheep, goat and Llama farms and ask for poo... will be a great way to meet some neighbors. ;)

I got a cool idea from Bort when he brought me some small circular hanging ornaments he had made from similar materials (sand, clay and horse dookie), but he had pressed glass into it! I really loved the look and idea so that is now the style I am working on.
All the materials for this project were utterly 100% FREE (as in no $ money $ spent) and no chemicals what-so-ever are involved. The glass was collected for recycling and was broken into pieces. Since I don't have any sand on hand to use, this project is considered COB and not POTTERY. (Thanks Panne for explaining the difference!)

Whatever it is, it's gonna be pretty when it dries solid and i can wipe off each pretty piece of glass! So far it sat over night and did not crack. The small places where i could tell it was pulling the day before I made sure to watch closely and fix early on.

YAY for earth friendly art!
XoXoxox

Wednesday, April 7, 2010

DIY:Rabbit Poo & Earth Clay Pottery

I get really excited when I think about making any kind of art supply/craft with stuff right outside my house for free, earth friendly & simple. So when I was told I could make some pottery with dried rabbit poop (alternately bone dry horse or cow poop) and some clay-ish soil dug from the ground I could not wait to get my hands on this project! So here is the 100% natural, chemical free, and old world process I tried out ::::

Gathering Supplies:

You will need to find some kind of super duper dried up poop of a grass/plant eating animal - and some dirt. The more hard clay the dirt is the better and easier to begin with. Sand can also be added to this project but I didn't have any, so I tried it without.

Gathering rabbit poop takes a while cause it's not exactly huge, but I knew a spot in a open area where I'd seen bunches of scat and tried filling up my can.... You'll want as much as you can get cause the more the poop the more malleable the clay will be.
Then I went to a spot I had found some clay a few inches under the black soil, it was a yellow/tan/brown colored clay.

Setting Up A Work Space:

I took a bench and set up a pile of the clay on a piece of wood I could knead the clay on, a plate of water for wetting the clay, and the rabbit poop to be crushed/powdered.
The Process:

I put the rabbit scat in a bowl and took a rough stone to crush it into a powder. The poop has to be super dry for this to work good.

In mortar and pedestal fashion, the poop will become a powder that you will need to add bit by bit to the clay.
I added it in slowly, kneading in the rabbit scat and water to keep it wet. The clay-ish dirt went from cracking and hard to work with to becoming a slimy traditional clay that was easy to shape and play with. More poop seems to mean more awesome!
Just like store bought clay, ya gotta roll it, mash it, move it, work it over and over to get it the right consistency. Also working out air bubbles.
I added water to keep if from cracking often... (i wonder if the sand would help with binding it together also???)
Pretty rad, right? Went from dirt in the ground to a ball of clay ready to be the whim of human imagination or functionality.
I decided to make a small simple coil pot, starting with a round slab - I didn't want to get in depth till i learned out the clay would work and dry...
Coil pots are jus' rolling out little snakes, and coiling them upward...
Then you can smooth the coil together with wet hands, to make the sides flat.
YAY! little pot. Tiny pot! Poop pot! Lovely pot!
I played around with making marks on it too with my knife (see below).

THE NEXT DAY:

So the next day my pot was rock hard, and I don't think it was even nearly all the way dry. First I am experimenting with sun drying, and then I would like to later throw it on a fire and hope it doesn't explode. But there was a problem already..........
It freakin' CRACKED on tha' bottom. shit. . . . . Nothing a little more clay can't fill in though.
What'dya say, that this DIY eco art project is a 90% success and 10% fail ? Seems 100% amazing to me regardless of the end result.
And, it still looks good from far away. ;)
Xoxoxox