Showing posts with label eco art works. Show all posts

Thursday, February 3, 2011

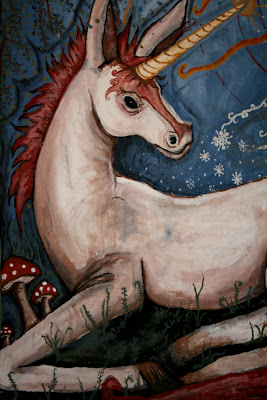
Milk Paint, Painting (Unicorn!)

xxxxxxxxxxxxxxxxxxxxxxxxxxxxxxxxxxxxxxxxx

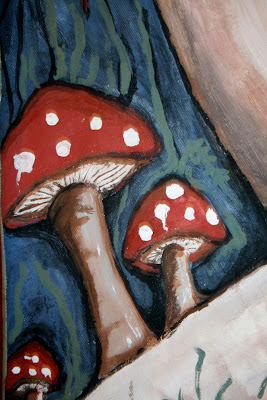
Milk paint! This is my first attempt at doing what i call a "real" painting using only organic milk paints. I wish when I went to school for art we had been taught more about our art supplies and less about outdated techniques & critiques. I never needed the technique lessons (or wasn't interested), but certainly it would have been eye opening to see how toxic paints were made, and learn some alternatives to them.
This milk paint is tricky to use as an artist paint, because of the way it dries and has to be stored, and used within a certain time frame. I happen to paint fast, but anyone who likes to take their time will most likely have to mix the paint each time in small batches... which isn't hard, just add (alot of) SUPER HOT water and stir it up. it is time consuming - but that can be fun too... i mean, the famous artists back in the days of old made all their own shit, they didn't pop over to the mass manfactured art store!
*
This painting is done on scrap canvas/tapestry type fabric, using only 100% organic milk paint. The video below shows the process.


Xoxoxox

Friday, September 10, 2010

All My Awls

Not too long ago I was needing an AWL to finish the brain tanned buckskin skirt I had started to craft at one of the Firefly Classes I took. With buckskin sewing, you poke holes with an awl into the leather and lace up the pieces that you would "sew" together with leather thongs (strips of leather, or laces of leather).
This was the first time I learned about the tool called an "awl" which by definition just means a long pointed spike and can be used in endless ways... but specifically I needed a stitching awl, a tool made from metal in modern times but back in the day it was crafted from carved bone dating back to the romans and the paleolithic age.
So to say I was delighted when suddenly I was given handmade awls, let's just say i was 'awl' vaclempt.
*
Bort hand carved two awl handles from some silver maple wood, one awl point he carved from a cow bone... the other a nail. The nail was hammered in first, then the nail head end cut off, and the metal sharpened with a metal file.
The metal is alot harder to sharpen by hand then the bone, I believe (correct me if I am wrong guys!).
Urban Scout used a larger deer bone, leaving the structure of the bone as a handle - and he said he sharpened the bone on a concrete sidewalk, and made a sharp flat shaped point.
This is what he said about the awl pictured above:
"Leslie, the bone awl is made from an “Ulna Bone” but I use cannon bones as well. The ulna has that nice finger holding groove in it and sits in the hand very nicely. Cannon bones and a bit more work."
*
I like the idea of using bone more then metal, because you can sharpen it on a rough stone (or like Scout right on the sidewalk outside a neighborhood house) - with metal I worry about breathing in metal dust or getting it in my eye.
For the awl handle I love both styles these guys made, but there is something really nice about the feel of the wooden handle fitting easily in the palm of my hand.
...
Now to finish that fringe buckskin mini skirt!!

Xoxoxox

Thursday, August 19, 2010

DIY Transformation: From Crusty Ole' Cabinet to Fly Lookin' Desk

When I moved into the Luck Cabin there was this one old cabinet that was no longer attached to the wall... just sitting empty next to my front door. At some point I had slid it across the room and started using the top as a spot to prop up my laptop and do all things internet related (like dis' blog!) After a while it dawned on me that I could add some legs to the thing and actually use it as a desk - and by flipping it over it would make the perfect flip top storage desk!
(Thanks to Bort for the idea of having it open on top, to resemble a kid's school desk.)
SUPPLIES I USED:
  • a long tree log to cut four legs
  • 8 screws (to attach 4 log legs to cabinet)
  • old cabinet
  • milk paint
  • sponge brush & matte knife & paper cut outs (for decorating)
STEP ONE: The Legs!
My uncle helped me attach the legs to the cabinet - the best way to do this is to be able to set the cabinet up on something that is the height of the legs, that way screwing in the hardware to hold them in place is much easier.
The other thing that needs to be right is each leg needs to be the same length, and FLAT/parallel on the top & bottom --- this may take a little extra effort when you are working with organically shaped logs rather then perfectly straight manufactured wood.
STEP TWO: The Stencils & Drawings!
I used a negative or relief technique to get the shapes i wanted - in stead of using silhouettes, i cut out the shapes and taped them down to the surface of the desk. I wanted to keep the light green/mint/pastel color that was already on there - and used black Milk Paint as my top coat color to carefully paint over the shapes. (Most of ya'll know by now I am in love with milk paint!! It is interesting to work with plus totally non toxic and bio-degradable!)
As the surface of the black paint was drying on top the old toxic mint colored paint, I decided to use the black paint like a scratch board and cut into the slightly moist black color with a matte knife - in this way i could draw back into the paint!!! Super fun. (I think the scratch method into milk paint is something that could be taken alot further....)
I did three sides and the top with relief pictures/stencils and drawings-here are what they looked like (above and below) as I was working on them- with the paint partly wet....
(i was going with a nature/primitive drawing theme.)
Hell yeah :)
And I ended it with a vague quip on the front....

The top opens up, just as planned... what do ya'll think I should hide in my special desk?
FINISHED TRANSFORMATION:::::::
All done and shoved into it's corner in the cabin, ready to have a laptop on top and me sitting in front. I think it rocks!!
Xoxoxo

Monday, April 12, 2010

Eco Art: Earth Clay & Rabbit Poo Part 2

This is NOT a big cookie ya'll! It's just more clay and rabbit scat.... and that's not chocolate chips I stuck on top there either, it's broken glass. But doesn't it look delicious, huh ? :)

I am loving making stuff out of the clay in the ground by my house and with rabbit poop! Only problem is I have run out of rabbit poop since I was just finding it out in the field (I don't have a rabbit.) I may have to walk down the road to the sheep, goat and Llama farms and ask for poo... will be a great way to meet some neighbors. ;)

I got a cool idea from Bort when he brought me some small circular hanging ornaments he had made from similar materials (sand, clay and horse dookie), but he had pressed glass into it! I really loved the look and idea so that is now the style I am working on.
All the materials for this project were utterly 100% FREE (as in no $ money $ spent) and no chemicals what-so-ever are involved. The glass was collected for recycling and was broken into pieces. Since I don't have any sand on hand to use, this project is considered COB and not POTTERY. (Thanks Panne for explaining the difference!)

Whatever it is, it's gonna be pretty when it dries solid and i can wipe off each pretty piece of glass! So far it sat over night and did not crack. The small places where i could tell it was pulling the day before I made sure to watch closely and fix early on.

YAY for earth friendly art!
XoXoxox

Monday, November 30, 2009

Eco Art: Self Portrait in Charcoal

This portrait is just a teaser, cause tonight I am working on a much larger charcoal drawing using the charred wood from inside my wood stove (which I am burning wood in for winter heat.) The drawing here though was a quickie self portrait I did while thinking deeply into how I can make fine arts truly part of my life again with the same joy I had when using the easy to access toxic art supplies I used to buy. Art by virtue of it's rebellious political stance really should naturally lend to a more earth friendly, recycled, upcycled and natural formation - AKA maybe a lil' less purchasing of mass manufactured supplies and more learning how to create our very own art supplies. Free is always good for the 'starving' artist anyhow. :)
This self portrait took only a few minutes, and was done on trash paper that had been stuffed in a box that was delivered to the house here... which made it 100% free and eco.
Can't wait to show ya' the next one...
xoxo

Friday, November 6, 2009

Mixed Media Eco Art & Project Fail

Here is my latest eco art project video! It is in a much more primitive style, but only because the handmade paper I recycled from junk mail was realllllly hard to draw and paint on. To make the picture I used charcoal from the wood stove, poke berries, coffee grinds, nasturtium flowers, yellow dock leaves, magazine clippings & pine sap for a 'glue'. The project was already difficult because the paper could break easily if pushed on hard (and i get a lil' rough with my art)- but in the end the project was a total FAIL because i coated it with an oil and wax mixture! The oil turned the paper dark and gray and bled the other forms and colors into each other. I do think wax would be great alone though for the stiffness and lasting quality- especially to seal in magazine collage pieces, which were only stuck in place with the pine sap. :)


XOXoxo