Showing posts with label upcycle. Show all posts

Sunday, November 14, 2010

Eco DIY: Organic Cotton "Alf" Dress

Yeah, ya read it right... ALF! ha ha ha.
This sewing project is more of a minor upcycle deal, see ya' don't need "Alf" to make this dress...(even though you might think you do!) All you need is an old t-shirt that is nasty, doesn't fit, etc from your closet, grandmaws closet or the thrift store... a t-shirt with a whimsical logo that can be cut out and re-sewn onto a new outfit. I put mine on an organic cotton dress I made from some locally woven fabric. But you could do this with a hoody and put the old logo/character on the back.
THE BEGINNING:::
I pinned down my dress pattern on the fabric, which was the pattern I traced from another dress I already had.
And then chop chop! Cut out the fabric, leaving enough room for the side seams.
I had folded the fabric over, so that the front and back would be cut at the same time. I like efficiency... :)))
I left the pattern pinned on while I sewed in the seams along the edge... then unpinned the pattern.
I love making things adjustable! So I made the top of the 'sleeves' or straps the kind you can tie to any size....
Once the organic dress was sewn together, it was time for ALF!!!
CAREFULLY pin your logo on, you want it really flat and even so that it doesn't wrinkle or bunch up the front of the shirt or dress or hoody or whatevs you may be sewing it on...
Then SEW! I used the basic straight stitch and slowly went around the circle of Alfness...
ALF HYSTERIA:::::
hysterical? lovable? weird? so was Alf.
You can wear it with or without a shirt underneath... summer time, or fall time...
party time?!? WWAD ? ;)

XOXOXOxox

Wednesday, September 29, 2010

DIY: Big Button Down Shirt Made To Fit

This won't be my most dazzling sewing project, but the idea of altering clothes to make them fit is a noble upcycle endeavour and I wanted to share my attempt. Taking a button down shirt that was too big for me (a men's medium), and sewing it down to a more fitted shirt my size.
*
My original idea was to somehow turn this into a mini-dress (i like to turn everything into mini dresses)... but it didn't work out since the length of the shirt was too short, and well.... you'll see...
SUPPLIES YOU NEED:
  • push pins
  • sewing skills (machine or needle/thread style)
  • thread
  • maybe a friend to help
STEP ONE:
I turned the shirt inside out and put it back on.
STEP TWO:
If you have a friend, have them put the pins along the right & left side of the shirt to make it fit to your personal curves, including the sleeves. Leave space for your sewing seams.
If you don't' have a friend over (like me) then carefully try and place the pins yourself - or use measurements. I hate measuring things so i tried standing really stiff and put pins in myself, but it wasn't as accurate as it should have been.
STEP THREE:
Sew along the seam lines you created with the pins.
AND....
You are already finished (or at least i am)!!! This would be great for making a new winter wardrobe on a shoe string budget, because thrift stores are packed with men's button down long sleeve shirts of all colors, patterns and solids which you could tailor to fit your body.
Funny Lookin' Fail ::::
I also did a lil' experiment with adding another layer of shirt at the bottom, which could make a really neat look if you have the right contrasting colors... which I did not. Stark white, with nice subtle plaid is a recipe for a terrible horrible no good country-fied look, but ya know what? I modeled the Sewing Fail for ya'll anyway.......
The Dolly Looks Better. (aka, this might work if ya have big boobies, sassy hair, and long tall legs. Being able to line dance & sing would help too.)
The Baggy Art-TEEst. (This look will work if you like your clothes swaying, loose, half buttoned and probably half assed.)
The Front Knot! (my personal favorite. This shit was hot in the 80's and we all know whether we like it or love it that pushing obscure 80's ideas is totally in style. Maybe not in my rural neighborhood {cause it never went out of style here}, but in Brooklyn, yes. Besides a front knot on a tight plaid shirt is so movie star country girl, roll in the hay - who doesn't like that? I am bringing this back to the fashion forefront right this minute.)
Maybe I can't win them all, but the whole idea is onto something good. ;)
Xoxoxo

Monday, May 3, 2010

DIY: Turn a Hillbilly Prom Dress into a Summer Dress

Holy beau-tee-ful mou mou-ness! I found this long prairie style gown at a local thrift store, and fell in love with the cotton fabric, the little late 70's flower pattern, and the layer of see-through material on top - not to mention the frill on the bodice with pink buttons!

Only thing is, no one really sports big long mou mou's anymore so I thought it would be great to take the focal point of the dress (the frilly chest area) and turn the rest of the gown into a smaller summer dress.

***

STEP 1 : I measured the dress for the length I wanted it, more of a mini dress. I measured from the top of my shoulder to where I wanted the dress to hit on my thigh - leaving a small amount of room for the hem line.
STEP 2: I used scissors to cut off the extra material (which is enough to make a whole 'nother skirt or dress!
Step 3 : I then turned the dress inside out so that I could make the other measurements, for my waist, chest, hip - then marked it with straight pins so that a new seam could be sewn.

NOTE: I had originally wanted to keep the sleeves on but because I had to take in many inches of fabric, I ended up removing the awesome see-through sleeves. In the end I liked this better anyway (not to mention i had no idea how to put them back on!)
STEP 4 : Sewing time! This is where I used all my measurements and straight pins to make all the new seams - the new seams will be along the right and left side (where the original seams are), and then to hem the bottom.
The new seams will depend on whether or not the dress fit you to begin with - if it already fits your size, all you'd have to do is hem it into a mini dress for summer fun!
YAY!!! This is the finished upcycled summer dress..... sooooooo not a mou mou no mo' ! In fact, this shit is so cute it's almost punk rock. I left frayed edges where the sleeves used to be for a more punky look.
Check out all the angles... (the frill makes it awesome from the side!)
Time for a party. :)
Xoxoxo

Thursday, April 29, 2010

Eco DIY : Turn A Silk Scarf Into A Halter Top

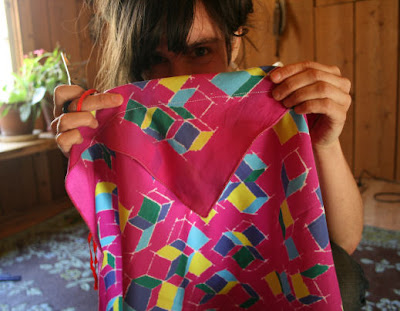
Check out this cute q-bert style 80's scarf! My friend Heather gave this to me as a gift, so that I could make a craft project with it and a simple DIY halter top is what I made...

Here is how I did it (it only takes about 5 -10 minutes to complete!) :::::

Step ONE: Take one of the corners and fold it over slightly, where you get a flat edge a few inches across.
Step TWO: Sew (with a machine or by hand) a line across the folded triangle, leaving a space at the top big enough to run a drawstring, necklace or ribbon through. The space it will create is a drawstring type hole.

Like this picture below... (you can cut off that extra fabric hanging under your stitch.)
Step THREE: Cut a drawstring out of stretchable jersey cotton fabric - or alternately grab a awesome necklace (sparkling bling!), fancy ribbon, braid some fabric, or even a piece of hemp twine will do! Get as creative as you want, as long as it can clasp or tie in the back to hold the halter top up.
Step FOUR: Run the drawstring through the drawstring hole you created when you made the stitch across the triangle. Attaching a safety pin to the end to pull it through always makes it easier...

(((Note: If the scarf is not large enough to tie in the back, add more fabric/drawstring to the pointed corners on the right and left sides for a simple tie.)))
ANDDDDDDDDDD, WA LA! A quickie fancy fun summer shirt you can sport with jeans, a skirt, to a party and to the beach...
The back ties together at the corners (but ties can be added to the corners if the scarf is too short!)
Funky Cold Medina! That sh*t is hawt! ;) Now I just wanna come up with one that is reversible...
Xoxo

Wednesday, March 10, 2010

DIY: Decorative Bamboo Ladder

Me and my mom were looking through the eco friendly Viva Terra catalog the other day (together ova' the phone) when she fell in love with their towel ladder featured as a super zen bathroom accessory. I remembered a few years back when they had one made of bamboo all decked out with organic towels hanging from it, and told her I would try and make one that was free, simple and with stuff I had around the house.

Here are the supplies you need:
  • bamboo
  • hand saw (or electric)
  • cutting shears (optional cause you can use your saw)
  • hammer (or something similar to pound with)
  • string (like hemp, jute or organic cotton)
FIRST: I cut two large pieces of bamboo approx. 5 feet high for the side pieces (posts), using a hand saw. The two sides must be the exact same size.

SECOND: I cut 5 smaller pieces of bamboo with my cutting shears (super easy!)
The 5 rungs of the ladder to hang your towels on can be a wide/ long as you like - depending on the width you'd like your ladder to be. Make sure these are all the same length though, more or less...
THIRD: I took the rungs and placed them on the ladder how i would like them to sit, then with a pencil marked lines on the right and left side of each end piece - meaning each rung had four marks, two for each side.
FOURTH: I used the hand saw to cut in grooves, for this neat little magic trick you can do with bamboo... you saw two parallel lines deep enough to hit the hollow part and.........
Then you take a hammer (or some kind of pounding tool) and bang the center between the two parallel lines - which causes a perfect square to open up. Usually it takes a hit or two before it breaks, and split in the middle and the very edges where your saw line ended.
Like this pic below... it just pops open, into a perfect square (or rectangle) - and you pull off the broken pieces with your fingers.
FIFTH: After cutting the grooves on the right and left side of the ladder for all 5 rungs, you can then place the rungs into the grooves.
SIXTH: With the rungs in place, it's time to take some eco friendly string (hemp, jute?) and tie them to the posts of the ladder. I used organic cotton fabric which I cut in strips because it was what I had around.
The type of string you use will change the look of the ladder - for a more island, zen look I think brown hemp rope would work best. But for me, I like the funky bold white ties cause it gives it a handmade primitive look. :)
I bet you could also paint your ladder with Milk Paint too, if you wanted it a certain color to match your decor!

Check out my end result - I totally think it's a big success!!!! And was FREE.
XoXoxoxo