xxxxxxxxxxxxxxxxxxxxxxxxxxxxxxxxx
I have to dance. There is snow here again, and I would like to become indifferent to the white on the ground and my whitening skin.
Why can't my teeth be white too?
xxoxoxox
Showing posts with label cheap fun. Show all posts
Showing posts with label cheap fun. Show all posts
Tuesday, February 8, 2011
Sunday, November 14, 2010
Dance Off!
 With the dawning of my video camera, I have found a dance mania re-kindled in me. Being a recluse about to embark upon a long long winter that may include many snowed in days... I came up with a lil' something fun for us all to do while inside.
A Dance Off!
No for realz... I even made ah-nother website for it today for those dancing fools, brave ones, silly ones, ready to be embarassed ones and even the ones who will blow us away.
Wanna see the spanky new website, then go HERE.
....
So here is how DANCE OFF works:
- I will pick one song a week (maybe more as we go along) for everyone to video themselves dancing to
- Each person uploads their video and sends me the link so I can put it on the Dance Off post of the week
The best part is EVERYONE is invited. Young, old, housebound, wheelchair bound, slow moving, fast moving, dramatic, bouncey, beautiful, hidious, professional and hopefully hysterical too! The whole point is to have fun, for free!
Sooo, Go NOW to find out what this weeks song is...
like now!
Xoxoxox
Eco DIY: Organic Cotton "Alf" Dress
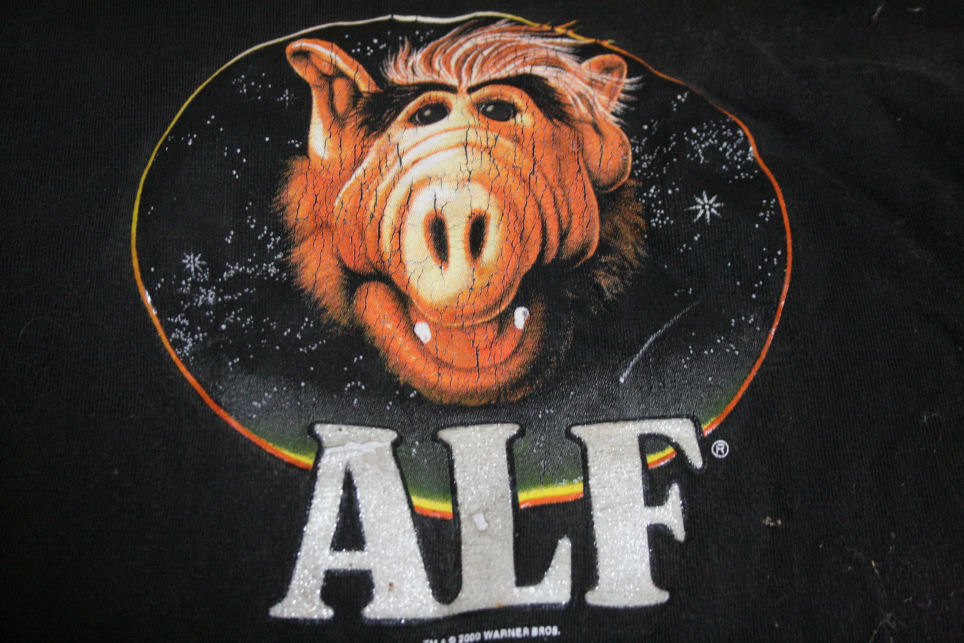 Yeah, ya read it right... ALF! ha ha ha.
This sewing project is more of a minor upcycle deal, see ya' don't need "Alf" to make this dress...(even though you might think you do!) All you need is an old t-shirt that is nasty, doesn't fit, etc from your closet, grandmaws closet or the thrift store... a t-shirt with a whimsical logo that can be cut out and re-sewn onto a new outfit. I put mine on an organic cotton dress I made from some locally woven fabric. But you could do this with a hoody and put the old logo/character on the back.
 THE BEGINNING:::
I pinned down my dress pattern on the fabric, which was the pattern I traced from another dress I already had.
And then chop chop! Cut out the fabric, leaving enough room for the side seams.
 I had folded the fabric over, so that the front and back would be cut at the same time. I like efficiency... :)))
 I left the pattern pinned on while I sewed in the seams along the edge... then unpinned the pattern.
 I love making things adjustable! So I made the top of the 'sleeves' or straps the kind you can tie to any size....
 Once the organic dress was sewn together, it was time for ALF!!!
 CAREFULLY pin your logo on, you want it really flat and even so that it doesn't wrinkle or bunch up the front of the shirt or dress or hoody or whatevs you may be sewing it on...
 Then SEW! I used the basic straight stitch and slowly went around the circle of Alfness...
 ALF HYSTERIA:::::
hysterical? lovable? weird? so was Alf.
 You can wear it with or without a shirt underneath... summer time, or fall time...

 You can wear it with or without a shirt underneath... summer time, or fall time...
party time?!? WWAD ? ;)


XOXOXOxox
Friday, November 5, 2010
Eco DIY: Fabulous Scrap Fabric Purse
 Craft bonanza! After making my patchwork blankie out of scrap fabric I sat down with a notebook & pen and started dreaming up other simple DIY projects. This handbag is not hard to make and looks very eco chic (superior handmade style!)
It's also made entirely out of fabric, so all you need are basic sewing skills to put it together.
*
STEP 1 :
Choose two contrasting fabrics, and pin them together in a rectangle shape to cut out.
 I chose some velvety animal print, and a kimono type fabric for their flamboyant contrast.
 STEP 2 :
Fold over the top edges of the purse, and sew a strong seam at the very bottom. This is to create a drawstring style hole for the purse straps to pull through.
 Both sides should then have the drawstring hole, which are sewn into the inner side of the purse. (see pic below)
 STEP 3 :
 Both sides should then have the drawstring hole, which are sewn into the inner side of the purse. (see pic below)
 STEP 3 :
Fold the purse over, with the drawstring holes lining up evenly. Sew a seam along both sides (left and right) but NOT over the drawstring holes.
 The purse should then look like this pic below... my animal print is the inner part, and the kimono fabric is the outside of the purse.


 Use a big safety pin to pull your braided strap through the drawstring holes on both sides...
 ...tighten the straps, then tie them together at the top.

 The purse should then look like this pic below... my animal print is the inner part, and the kimono fabric is the outside of the purse.
STEP 4 :
THE STRAPS ::::
Cut six strips of scrap fabric (or tie pieces together), make two groups of 3 strips, tie a knot at the top of each one, then BRAID! yay! I love braiding. :)

 Use a big safety pin to pull your braided strap through the drawstring holes on both sides...
 ...tighten the straps, then tie them together at the top.
ALL DONE!
HANDBAG HEAVEN :::::
How easy and cute is that?! Plus functional! You could use this as a purse, but also as a knitting/crochet bag! Or maybe carry your small pets around the house in it. ;)
 I like this eco crafting project alot... now back to my notebook to think up more things I can do with this fabric.

 I like this eco crafting project alot... now back to my notebook to think up more things I can do with this fabric.
****
Here is a quick lil' tutorial vid for this DIY Purse project -(if you learn better with music and short commands...) ;)
Xoxoxo
Wednesday, September 8, 2010
Eco Cabin Exterior Facelift Ideas that are FREE
 My cabin, is a bit more of a shack... I'd like to think of it as the Love Shack though! Let's just say it's been known to be called such names as "rickety", "not year round", and "hunters cabin" - but since I have moved into the tiny wonder back in March I have happily put a ton love labor into making the once seasonal shack into a year round cozy home.
Some projects are more affordable to start then others (a more efficient roof VS. gray water system), depending not only on your budget but on your personal level/ability to do your own labor OR maybe having some huge group of friends who somehow wanna spend their time fixing your house instead of theirs. :)
*
Here are three simple, free and beautiful ways to transform a rustic cabin into a WOW, HOW AWESOME rustic cabin:::::
1. Change all the outside poles/columns/supports from the square store bought ones to small tree trunks. How is it eco to cut down the trees? Well I used a hemlock tree next to my house which was dead, I not only opened up more sun to my front herb garden, but made use of the wood in a way that took my cabin out of the "rickety" category and into southern rustic beauty.
 I am using the hemlock trunks all the way around the porch. It's awesome how well it blends in with the forest!
 If ya don't believe me what a HUGE change using naturally shaped trees make on the cabin's appearance, check out this BEFORE picture below... (that is the Luck cabin before I moved in and made any changes, the porch poles were rotten 2x4's....)
 2. Cut your own railings! The forest is full of downed trees/thick branches, and it takes little effort with a hand saw to cut some porch railings, gather them and then get really creative about adding them to the outside or inside of the house. If you don't live in a forest, there are people having branches cut off their hardwood trees in the city all the time, why not ask a local company if you can pick some up one day.
 3. Stones! I can never really have enough of them, I am a total sucker for the look of a stone path. I got these rocks (pictured below) from when the pipes for my gravity fed water were buried and these were dug up...if you don't have alot of big rocks, or enough rocks think of all the things you could do with even just a small amount of rocks - mosaics on stepping stones made of concrete (which is cheap), mosaics on a bathroom floor or wall, around some windows, decorating a hand built cob oven.
 The main point is, wherever you are there are some resources that are probably free or cheap, so start looking around. I find that when I am forced into FREE creativity, things just turn out so much more interesting then anything Lowes or Home Depot could sell me.
*
EXTRA TIPS FOR CHEAP & ECO HOME IMPROVEMENT:
- Buy from thrift stores when decorating! Piles of fabrics, fun lighting, lamps, quilts, pictures, paintings and then some wait for you for only dollars.
- Need new thermal windows, try your local HABITAT FOR HUMANITY first - tons of house building supplies for much cheaper.
- Use your own skills, and the skills of local people around you!
- One man's trash is another's treasure, think out of the box - someone somwhere is throwing away what you need... go find it.
YAY for DIY!
PS- if anyone has done similar minded projects I would love to see pictures, send links!
xoxox
Thursday, July 29, 2010
DIY: White Trash Jungle Jean Shorts
 Yesterday when I was working around the cabin I ripped the knee of yet another freakin' pair of organic jeans! Luckily I got them for a nominal price off e-bay, so I had no problem turning the ailing denim into a pair of short shorts! In fact, I was kinda waiting for something like this to happen so I could try out my idea....
***
MATERIALS NEEDED:
- old jeans
- scissors
- string, ribbon, hemp, cord or something similar
- hammer & nail w/ small piece of wood (OR) an awl
 STEP 1: I took a pair of shorts that already fit me so I could get a basic measurement for the length of my new jean shorts... only with denim it's better to cut a lil' extra first cause you can always cut more off later after trying them on.
I added an extra 2 inches (plus) when I cut the length, cause I wanted to be able to roll them up.
 STEP 2: I then took my side seams and cut them completely open. Since the jeans were a little loose on me, i cut out an extra quarter inch to help them tighten up (once I laced them back together.)
 STEP 3: Since I don't yet own an AWL, I decided to use a hammer and nail with a piece of wood to punch holes up the side seams. These holes are going to be used to lace up the sides of the shorts like a corset.
 STEP 4: For laces I used chemical free brain tanned buckskin, in order to make the ends easy to lace with I put a tiny bit of oil on the edge and then burned it. This makes the brain tanned buckskin harden and can be used as it's own needle.
 I laced evenly up the sides using the holes punches with the hammer and nail....
 Once I laced from bottom to top, I simply tied a knot at the top, then did the other side of the shorts exactly the same way.
 Best CheCk It BeFoRe Ya Wreck It!
 These jean shorts are the best kind of rock -n- roll jungle safari trash style!!! And with those laces, it's adjustable! :)))
 FINISHED SASS & TRASH SHORTS :::::::


 YAY!!!! Now time to go back to work, and I hope these don't rip like the jeans did...

 FINISHED SASS & TRASH SHORTS :::::::


 YAY!!!! Now time to go back to work, and I hope these don't rip like the jeans did...
XOXOXoox
Wednesday, July 28, 2010
Rustic Fence Gate From Wood Scraps
 For the love of mah DOnkee - the fence is going up and I made sure there were three spots with gates for me to get in the domesticated animal ring! I decided to get artsy with my smaller fence gates which will be next to my house and behind the pond, by using whole hardwood tree branches & scrap wood that was piled up on my porch from all the other projects going on.
 The basic premise I followed to make the small gates were alot like making a frame to stretch canvas over for paintings. Even though I was using raw materials, like branches I created a square/rectangle/box shape following my measurements (approx. 4 feet high and 36 inches wide).
And to support the box, it needed corner braces...
 There may be better ways to do this, but I was using mostly hand tools and winging the design(as always I am open to suggestions, and ways to make things easier too!). I was careful to put in extra screws to increase it's durability.
 As a finishing rustic look, i took other twisted branches and screwed them to the front of the gate-! Pretty cool huh? Now Jus' two more to go & I am picking up mah DOnkee this weekend.....
*
(Helpful Hint::: If you wanna make something like this make sure to pre-drill holes and use really long screws!)
 NEW BONUS PIC :::::: (Here is the second gate on the right I built today, July 29th!)
 xoxoxo
 NEW BONUS PIC :::::: (Here is the second gate on the right I built today, July 29th!)
 xoxoxo
Subscribe to:
Posts (Atom)

